Programmatic Auth Configs
Create auth configs programmatically
Auth configs are created once and reused many times. However, when managing multiple toolkits, you may want to create auth configs programmatically.
- When creating and destroying auth configs multiple times in your app's lifecycle.
- When creating auth configs for your users' users.
OAuth2 based apps
Using Composio Default Auth
Since OAuth2 is the most common authentication type for applications, Composio provides managed auth for most OAuth2 based applications. This is to speed up development and prototyping. This means you don't have to provide your own OAuth credentials.
from composio import Composio

composio = Composio()

# Use composio managed auth
auth_config = composio.auth_configs.create(
    toolkit="github",
    options={
        "type": "use_composio_managed_auth",
    },
)
print(auth_config)
import { Composio } from "@composio/core";
const composio = new Composio();
const authConfig = await composio.authConfigs.create("GITHUB", {
name: "GitHub",
type: "use_composio_managed_auth",
});
console.log(authConfig);The returned auth_config_id should be stored securely in your database for future use to be created and destroyed multiple times.
You can also provide your own authentication details. The required credentials and authScheme depend on the auth type.
Using your own OAuth2 credentials
Setting up and using your own OAuth2 credentials is the recommended way when going to production or expecting high usage.
In this example, we're using our own OAuth2 client ID and secret to create the auth config for Notion.
# Use custom auth
auth_config = composio.auth_configs.create(
    toolkit="notion",
    options={
        "name": "Notion Auth",
        "type": "use_custom_auth",
        "auth_scheme": "OAUTH2",
        "credentials": {
            "client_id": "1234567890",
            "client_secret": "1234567890",
            "oauth_redirect_uri": "https://backend.composio.dev/api/v3/toolkits/auth/callback",
        },
    },
)
print(auth_config)
const authConfig = await composio.authConfigs.create("NOTION", {
name: "Notion",
type: "use_custom_auth",
credentials: {
client_id: "1234567890",
client_secret: "1234567890",
oauth_redirect_uri: "https://backend.composio.dev/api/v3/toolkits/auth/callback",
},
authScheme: "OAUTH2",
});
console.log(authConfig);You can specify a custom redirect URI by including the oauth_redirect_uri parameter in the credentials object. If not provided, Composio uses the default redirect URI.
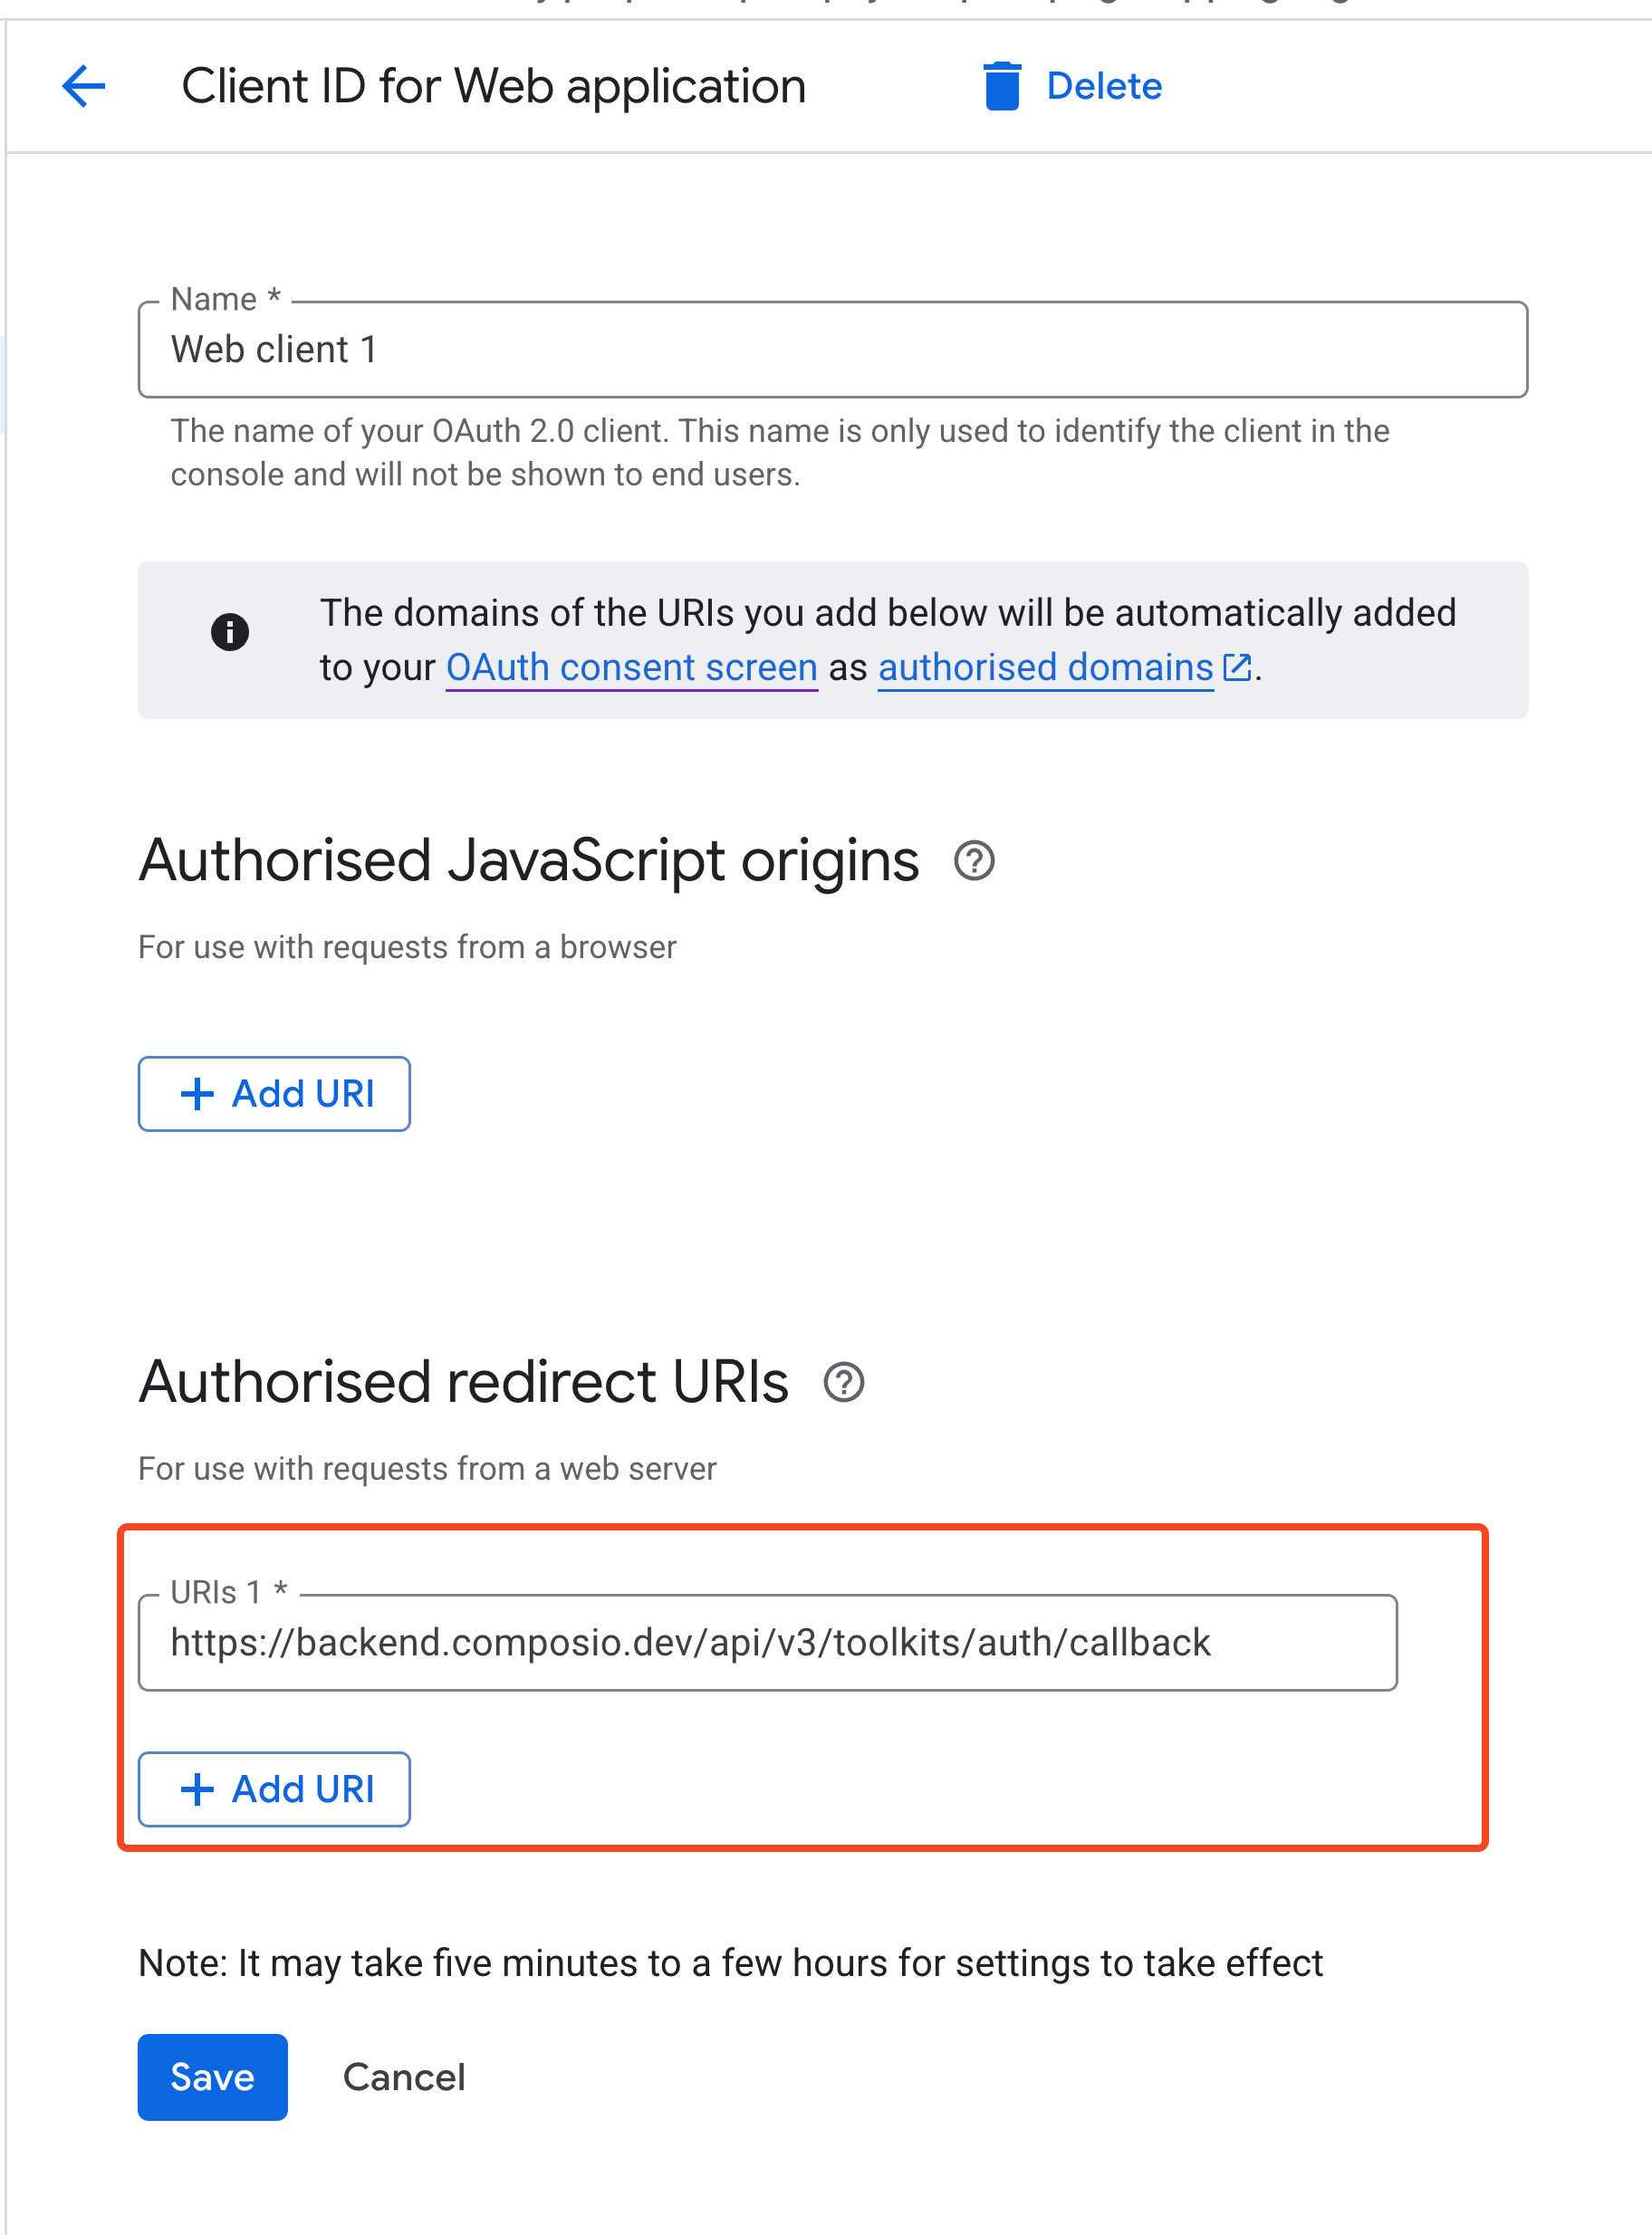
Specifying the authorized redirect URI
The process of setting up your own OAuth2 credentials usually involves generating a client ID and secret and specifying the authorized redirect URI in the OAuth configuration.
The authorized redirect URI is the URI that captures the OAuth code that is returned to the app.
While doing so, you must ensure to set the authorized redirect URI in the OAuth configuration to:
https://backend.composio.dev/api/v3/toolkits/auth/callback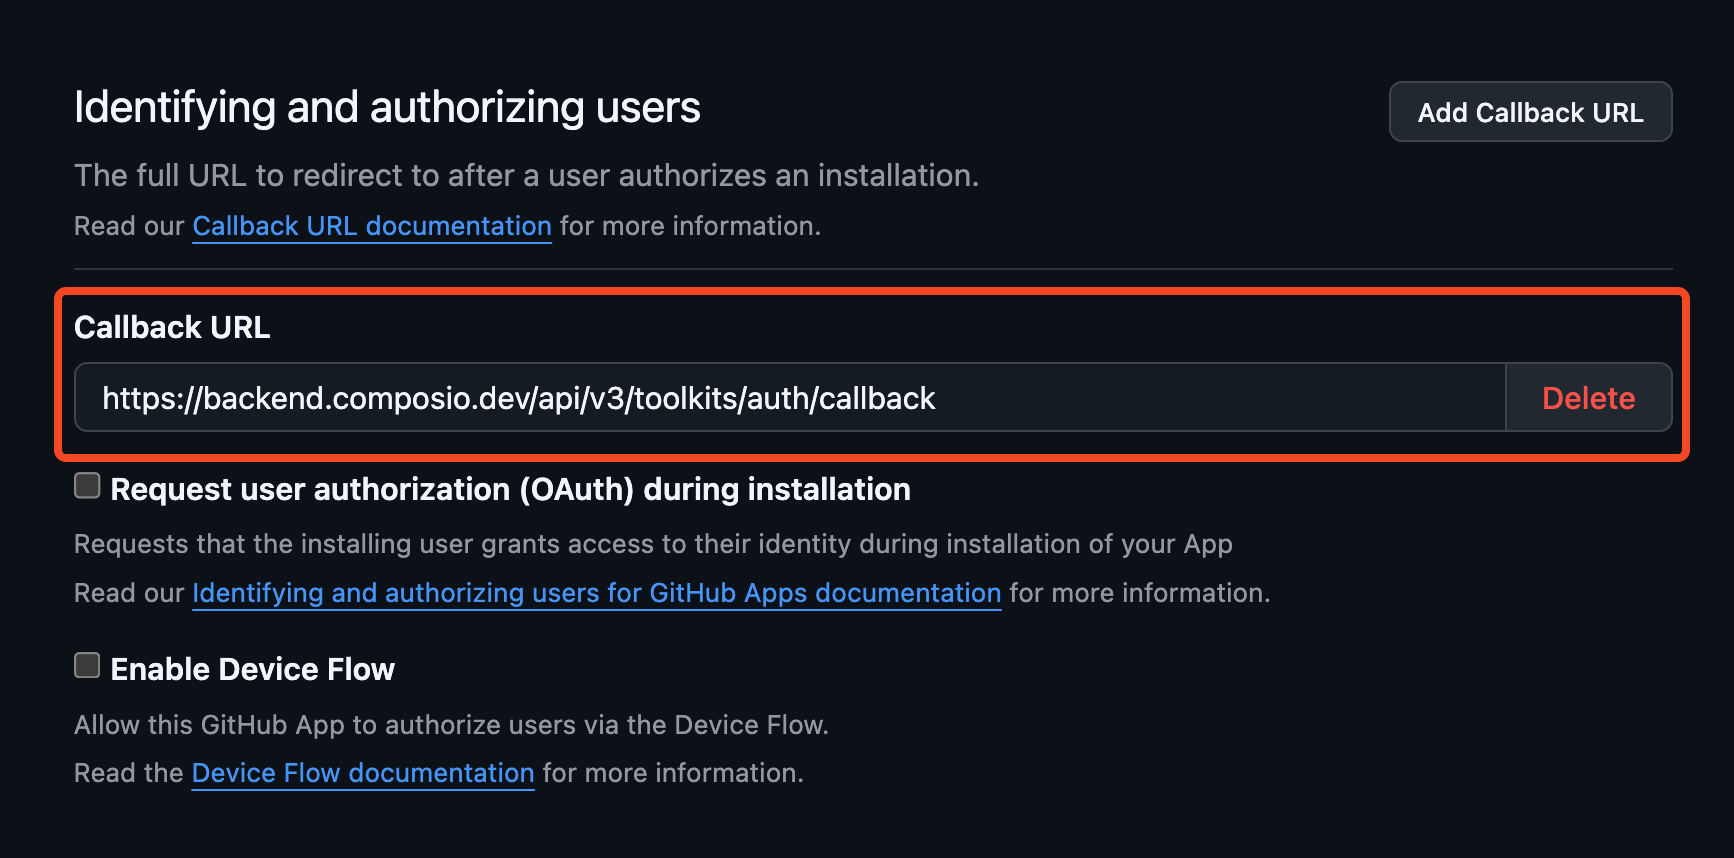
Specifying scopes
Composio requests a set of appropriate default OAuth2 scopes for each toolkit wherever possible. However, you can override or modify these scopes by passing a scopes field to the credentials object.
from composio import Composio

composio = Composio()

response = composio.auth_configs.create(
    toolkit="HUBSPOT",
    options={
        "name": "HubspotConfig",
        "authScheme": "OAUTH2",
        "type": "use_composio_managed_auth",
        "credentials": {
            "scopes": "sales-email-read,tickets"
        }
    }
)

print(response.id)
import { Composio } from "@composio/core";
const composio = new Composio();
const authConfig = await composio.authConfigs.create("HUBSPOT", {
name: "HubspotConfig",
type: "use_composio_managed_auth",
credentials: {
scopes: "sales-email-read,tickets",
},
});
console.log(authConfig);Other auth types
Composio supports many applications that use different authentication types like API keys, Bearer tokens, JWT and even no authentication at all.
Generating the auth config for other auth types only has minor differences:
use_custom_authis used instead ofuse_composio_managed_auth- The
credentialsfield is used to pass the authentication details - The
authSchemefield is used to specify the auth type
# Use custom auth
auth_config = composio.auth_configs.create(
    toolkit="perplexityai",
    options={
        "type": "use_custom_auth",
        "auth_scheme": "API_KEY",
        "credentials": {}
    },
)
print(auth_config)
const authConfig = await composio.authConfigs.create('PERPLEXITYAI', {
name: 'Perplexity AI',
type: 'use_custom_auth',
credentials: {},
authScheme: 'API_KEY',
});
console.log(authConfig);Programmatically inspecting fields
In cases where you need to dynamically discover the exact field names and handle different auth schemes programmatically, you can inspect the auth config details first.
This works for all auth types.
required_fields = composio.toolkits.get_auth_config_creation_fields(
    toolkit="NOTION",
    auth_scheme="OAUTH2",
    required_only=True,
)
print(required_fields)
const toolkits = await composio.toolkits.get("NOTION");
// Extract field names from authConfigDetails
const authFields = await composio.toolkits.getAuthConfigCreationFields('NOTION', 'OAUTH2', {
requiredOnly: true,
});
console.log("Required auth config fields:", authFields);Then inspect the required fields and specify them in the credentials object.